Auth
The CipherMail Gateway back end exposes a REST API that is used by both the web-based user interface and the command-line (CLI) tool to configure and manage the system. To call the REST API, you must sign in with an admin account. Admin accounts and their credentials are created and maintained with the CLI tool.
Access to the REST API is controlled by roles and permissions:
A permission grants access to a specific capability or set of endpoints in the API.
Permissions are grouped into roles.
Roles are assigned to admin accounts.
An admin can only use an API endpoint if their assigned roles include the required permission. This design ensures least-privilege access: administrators only see and do what their roles allow.
Permissions
Access to each capability or property requires a specific permission.
The gateway uses a comprehensive permission model with approximately 1700 distinct permissions. For every property, there are separate permissions to get and to set values at three scopes: global, domain, and user.
To list all available permissions, use the following cli command:
ciphermail-cli auth permissions all
To get a list of all permissions assigned to an admin, use the following cli command:
ciphermail-cli auth permissions effective --name <admin>
Roles
Permissions are granted to roles rather than directly to users. Roles can inherit other roles, allowing you to build reusable role sets. The system includes a default role named admin; it is created or updated each time the back end starts and is automatically granted all available permissions.
Note
In a standard installation, there is typically another role called portal. This role is assigned to the portal administrator and is used by the portal back end.
Use the following CLI commands to manage roles (see CLI Commands for all role related commands)
Create a role
NAME
       auth role create - Create new role

SYNOPSIS
       auth role create --name <string>

OPTIONS
       --name <string>
       name of new role
       [Mandatory]
Add permissions
NAME
       auth role permissions add - Add permissions to a role

SYNOPSIS
       auth role permissions add --name <string> --permissions <string-list>

OPTIONS
       --name <string>
       name of role
       [Mandatory]

       --permissions <string-list>
       permissions to add
       [Mandatory]
Delete a role
NAME
       auth role delete - Delete role

SYNOPSIS
       auth role delete --name <string>

OPTIONS
       --name <string>
       name of role to delete
       [Mandatory]
Inherit roles
NAME
       auth role inherited set - Set inherited roles for a role

SYNOPSIS
       auth role inherited set --name <string> --inherited-roles <string-list>

OPTIONS
       --name <string>
       name of role
       [Mandatory]

       --inherited-roles <string-list>
       inherited roles
       [Mandatory]
Admins
To use the REST API or the web interface, you must sign in with a valid administrator account. For added security, administrator access can be restricted to specific IP addresses or ranges.
Hint
In a standard installation, two administrator accounts are created: cli and
portal. These accounts can be accessed only from the local host (127.0.0.1).
The cli account has the admin role and therefore full permissions. The
portal account has a restricted portal role that grants only the minimum
permissions required by the portal backend.
To add a new admin using password authentication with full permissions, execute the following cli commands:
To create a new administrator account with full privileges using password-based authentication, run the following CLI commands:
ciphermail-cli auth admin add --name <admin> --authentication-type username-password
ciphermail-cli auth admin password --name <admin> --password <password>
ciphermail-cli auth admin roles set --name <admin> --roles admin
Use the following CLI commands to manage admin credentials (see CLI Commands for all admin related commands)
Add admin
NAME
       auth admin add - Add new admin

SYNOPSIS
       auth admin add --name <string> --authentication-type <username-password | oidc>

OPTIONS
       --name <string>
       name of new admin
       [Mandatory]

       --authentication-type <username-password | oidc>
       [Mandatory]
Hint
In most setups, set --authentication-type to username-password. Use oidc
only if OpenID Connect is configured in your environment (for example,
with Entra ID).
Delete admin
NAME
       auth admin delete - Delete admin

SYNOPSIS
       auth admin delete --name <string>

OPTIONS
       --name <string>
       name of the admin to delete
       [Mandatory]
Set password
NAME
       auth admin password - Set admin password

SYNOPSIS
       auth admin password --name <string> --password <string>

OPTIONS
       --name <string>
       name of admin
       [Mandatory]

       --password <string>
       password for the admin
       [Mandatory]
Set Roles
NAME
       auth admin roles set - Set roles for an admin

SYNOPSIS
       auth admin roles set --name <string> --roles <string-list>

OPTIONS
       --name <string>
       name of admin
       [Mandatory]

       --roles <string-list>
       roles for the admin
       [Mandatory]
Get all admins
NAME
       auth admin get all - List all admins

SYNOPSIS
       auth admin get all
EntraID 
This section guides you through setting up authentication with Microsoft Entra ID (formerly Azure Active Directory).
Before you start, make sure you have administrator access to your Entra ID tenant and know which users or groups should be allowed to sign in.
At a high level, you will register or use an existing application in Entra ID, configure redirect and logout URLs, generate client credentials, assign the appropriate permissions, and then copy the tenant ID, client ID, and client secret into the product’s authentication settings.
To set up Microsoft Entra ID authentication, complete the steps below.
Create an App Registration on the Entry ID page
Create a client secret
Create an Ansible override file
Run the playbook
For every admin, add an admin with authentication type set to oidc
Create App Registration
Sign in to the Microsoft Azure portal and open the Microsoft Entra ID service. Find your Tenant ID and make a note of it, as you will need it in the next steps.
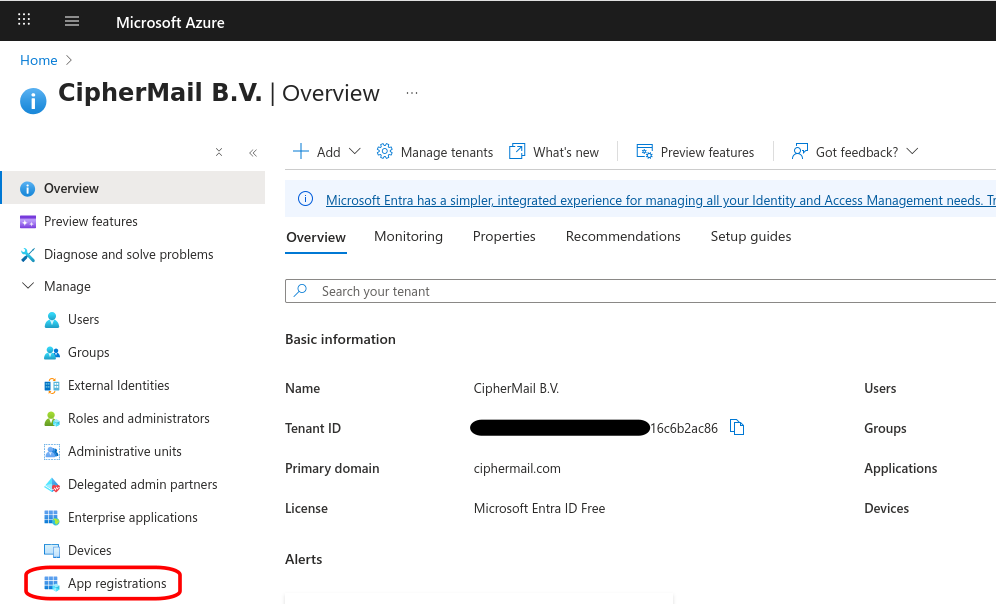
Open the “App registrations” page and click New registration
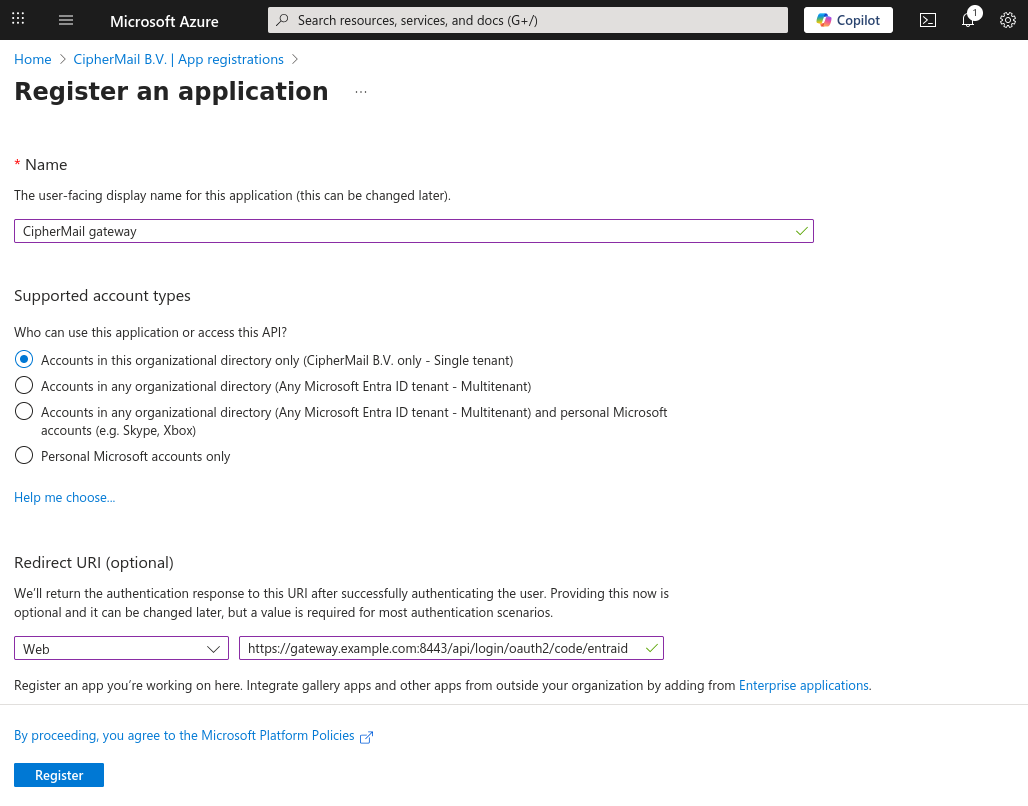
Set a “user-facing display name”
Select “Accounts in this organizational directory only”
Under “Redirect URI” Select “Web” and set the URL to https://<hostname>:8443/api/login/oauth2/code/entraid where
<hostname>should be replaced by the fgqdn of the CipherMail gatewayClick Register to add the new app registration
Hint
If you operate multiple CipherMail Gateways (for example, in a high-availability cluster), configure a separate “Redirect URI” for each gateway instance.
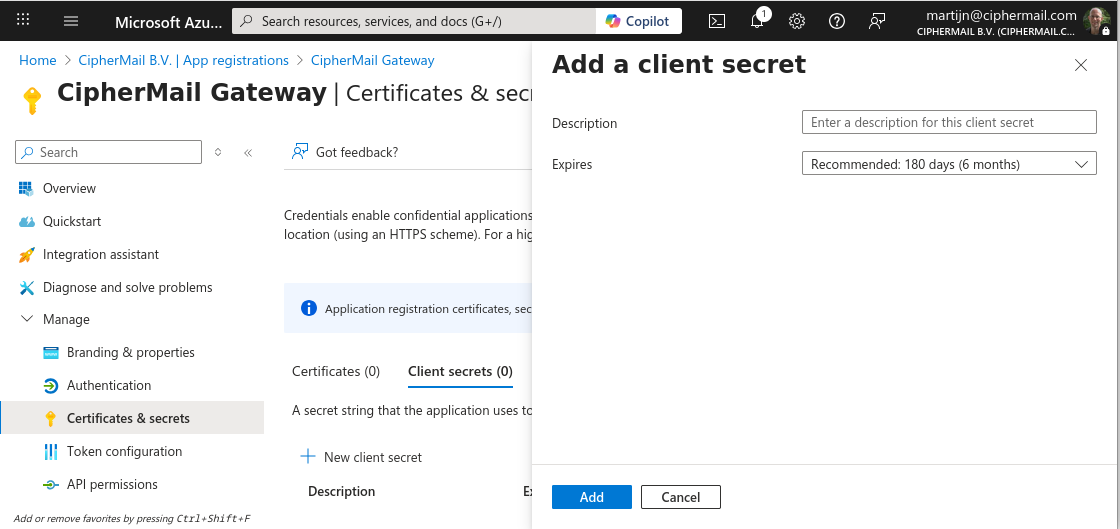
Create a Client Secret
On the App Registration page, click Certificates & Secrets, then Client secrets and click New client secret.
Enter a descriptive name, choose an expiration date, and select Add. The “Certificates & secrets” page will then display the newly created secret.
Attention
The secret value is displayed only once. Copy it now, as you will need it in the next steps.
Create Ansible override file
To enable EntraID, you need to create an ansible override file:
Create the file using the Cockpit File Browser (or use an SSH client)
sudo vi /etc/ciphermail/ansible/group_vars/all/entraid.ymlPaste the following configration.
---
ciphermail_entraid__enabled: true

# must be set to your Azure Tenant ID
ciphermail_entraid__azure_tenant_id: '<tennant-id>'

# must be set to the client id
ciphermail_entraid__client_id: '<client-id>'

# must be set to the client secret
ciphermail_entraid__client_secret: '<client-secret>'
Replace
<tennant-id>with your tenant ID,<client-id>with the client ID (which can be found on the “App registration overview page”) and<client-secret>with the client secret value (from the previous step)Login the shell using Cockpit Terminal (or use an SSH client)
Run the ansible playbook
sudo cm-run-playbookHint
the
sudocommand might ask for your Unix account password.
Add OIDC admin
With the CipherMail gateway, OIDC is only used for authenticating the admin, not for authorization. The main reason for this is that the gateway permission model is not compatible with the OIDC permission model. To allow OIDC login, an admin account with authentication type set to oidc should be added.
ciphermail-cli auth admin add --name <email> --authentication-type oidc
ciphermail-cli auth admin roles set --name <email> --roles admin
Replace <email> with your EntraID email account.
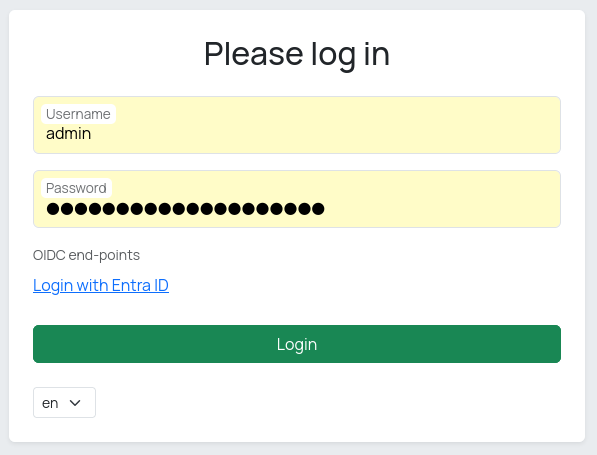
Login with EntraID
When you open the admin UI login page, you will see a Login with Entra ID option on the login page. Selecting this option starts the OpenID Connect (OIDC) sign-in process.
Hint
If sign-in fails, verify that the redirect URL exactly matches what is configured in Entra ID, that time is synchronized on all systems, that the user has the required role or group membership and that the authentication-type of the admin is set to oidc.
Attention
During startup, the gateway contacts Entra ID to retrieve the provider’s configuration (endpoints and supported features) from a well-known JSON discovery URL. If this connection fails, startup is terminated and the gateway will not start.
To allow the gateway to start when Entra ID is unavailable:
Create an administrative user with a password.
Disable Entra ID by setting
ciphermail_entraid__enabledtofalse.Run the playbook to apply the changes.
LDAP
This section guides you through setting up authentication with an external LDAP server. The LDAP server should support bind authentication.
Note
The LDAP server is used only for user sign-in (authentication) and does not control roles or permissions (authorization). You must still create an administrator account in the application’s back end and assign the required permissions.
To set up LDAP authentication, complete the steps below.
Create an Ansible override file with the LDAP configuration
Run the playbook
For every admin, add an admin with authentication type set to ldap
Create Ansible override file
To enable EntraID, you need to create an ansible override file.
An administrator is authenticated by performing an LDAP bind against a distinguished name (DN). You can provide the user DN in one of two ways: specify the DN directly, or search for it using a search filter. At least one of these methods is required. It is recommended to directly bind to a DN and not search for a user because searching requires an authenticated user.
The following ansible variables are supported (the default values are shown):
ciphermail_backend__ldap_authentication_uri: ''
ciphermail_backend__ldap_authentication_user_dn_pattern: ''
ciphermail_backend__ldap_authentication_search_filter: ''
ciphermail_backend__ldap_authentication_search_base: ''
ciphermail_backend__ldap_authentication_deref_link_flag: false
ciphermail_backend__ldap_authentication_search_sub_tree: false
ciphermail_backend__ldap_authentication_search_time_limit: 0
ciphermail_backend__ldap_authentication_bind_user_dn: ''
ciphermail_backend__ldap_authentication_bind_password: ''
ciphermail_backend__ldap_authentication_uri
Specify the LDAP server using a URL in this format:
ldap://localhost:389/<base-dn>. When a base DN is included, it becomes the default base (suffix) for all operations. In that case, provide only relative distinguished names (RDNs) in your operations; do not include full distinguished names (DNs).
ciphermail_backend__ldap_authentication_user_dn_pattern
The user DN template to bind to. The special parameter
{0}will be replaced by the name of the admin.
- Example::
uid={0},ou=Users,o=ciphermail,dc=example.com,dc=com
ciphermail_backend__ldap_authentication_search_filter
If you cannot bind using an explicit DN, configure a search filter to locate the administrator’s DN in the LDAP directory. The special parameter
{0}will be replaced by the name of the admin.
- Example::
uid={0}
ciphermail_backend__ldap_authentication_search_base
The base distinguished name (DN) that serves as the starting point for the search.
ciphermail_backend__ldap_authentication_deref_link_flag
Enables LDAP alias dereferencing. When this option is turned on, the directory follows alias references during searches and returns the target entries instead of the alias objects. This can improve accuracy if your directory uses aliases to point to real entries. If you want aliases to be treated as regular entries and not followed, leave this disabled. Note that dereferencing may increase search time and could reveal data from aliased branches, so enable it only if your directory design requires it.
ciphermail_backend__ldap_authentication_search_sub_tree
When enabled, the search scans all entries within and below the specified search base DN, not just the base itself. Use this option if you want results from the entire subtree starting at the base DN. Disable it if you only want to search the exact base DN level.
ciphermail_backend__ldap_authentication_search_time_limit
Sets the maximum time, in milliseconds, to wait for an LDAP search to complete. Use 0 to wait indefinitely.
ciphermail_backend__ldap_authentication_bind_user_dn
Most LDAP servers require you to sign in (bind) before they allow directory searches. Configure the setting
ciphermail_backend__ldap_authentication_bind_user_dnwith the DN of a service account that will be used to perform these authenticated searches.Use a dedicated, read-only service account rather than a personal user. Ensure this account has permission to search the relevant base DN and read the attributes your application needs. You will also need to provide the corresponding password in the matching password setting for this account.
ciphermail_backend__ldap_authentication_bind_password
The password for the user specified in the
ciphermail_backend__ldap_authentication_bind_user_dnsetting
Create an override file using the Cockpit File Browser (or use an SSH client)
sudo vi /etc/ciphermail/ansible/group_vars/all/ldap.yml
Example configuration with direct bind:
---
ciphermail_backend__ldap_authentication_uri: 'ldaps://ldap.example.com:636'
ciphermail_backend__ldap_authentication_user_dn_pattern: 'uid={0},ou=Users,o=ciphermail,dc=example,dc=com'
Example configuration with search bind:
---
ciphermail_backend__ldap_authentication_uri: 'ldaps://ldap.example.com:636'
ciphermail_backend__ldap_authentication_search_base: 'o=ciphermail,dc=example,dc=com'
ciphermail_backend__ldap_authentication_search_filter: 'uid={0}'
ciphermail_backend__ldap_authentication_search_sub_tree: true
ciphermail_backend__ldap_authentication_bind_user_dn: 'uid=admin,ou=Users,o=ciphermail,dc=example,dc=com'
ciphermail_backend__ldap_authentication_bind_password: 'password'
Example configuration for Windows AD Server:
---
ciphermail_backend__ldap_authentication_uri: 'ldaps://server.example.com:636'
ciphermail_backend__ldap_authentication_search_base: 'cn=Users,dc=example,dc=com'
ciphermail_backend__ldap_authentication_search_filter: 'samAccountName={0}'
ciphermail_backend__ldap_authentication_search_sub_tree: true
ciphermail_backend__ldap_authentication_bind_user_dn: 'cn=<put bind display name here>,cn=Users,dc=example,dc=com'
ciphermail_backend__ldap_authentication_bind_password: '<password>'
Run playbook
After creating of changing the ansible ovrride file, the playbook should be run:
sudo cm-run-playbook
Add LDAP admin
The LDAP server is used only for user sign-in (authentication) and does not control roles or permissions (authorization). You must still create an administrator account in the application’s back end and assign the required permissions.
ciphermail-cli auth admin add --name <name> --authentication-type ldap
ciphermail-cli auth admin roles set --name <name> --roles admin
Replace <name> with your LDAP account name.