Setup
The CipherMail gateway can be installed on a compatible Linux distribution, or a fully pre-configured Virtual Appliance can be deployed on a supported hypervisor, such as VMware, Hyper-V, or a KVM/Qemu-based system like Proxmox.
Please note that the manually installed system is quite similar to the Virtual Appliance, as the Virtual Appliance is installed using the same installation script employed for manual installations.
Tip
If you are using VMware, HyperV, or a KVM/Qemu-based system such as Proxmox, it is highly recommended to utilize the pre-configured Virtual Appliance.
Port usage
The tables below provide an overview of the port usage:
- External → Internal
Port
Service
Description
22
SSH
Console access
25
SMTP
MTA
80
HTTP
ACME (Lets Encrypt)
161
SNMP
443
HTTPS
Portal Web UI, ACME (Lets Encrypt)
8443
HTTPS
Admin UI
9090
cockpit
Cockpit app
- Internal → External
Port
Service
Description
25
SMTP
MTA
80
HTTP
CRL download
443
HTTPS
SMS gateway, Remote PKI etc.
11371
HKP
PGP HTTP Keyserver Protocol
- Internal → Internal (HA cluster)
Port
Service
Description
22
SSH
Console access
2424
LTMP
iMap delivery
4444
Galera
MariaDB cluster
4567
Galera
MariaDB cluster
4568
Galera
MariaDB cluster
12345
iMap
iMap replication
Tip
If specific services are not in use, the corresponding ports do not need to be open.
Using the Virtual Appliance
If you are using VMware, HyperV, or a KVM/Qemu-based system such as Proxmox, it is highly recommended to utilize the pre-configured Virtual Appliance.
The Virtual Appliance should be imported using the tools provided by the virtualization solution. For more information on importing the Virtual Appliance, see the Virtual Appliance Guide
The virtual appliance comes pre-configured with a cli user. The initial login credentials for the cli user are:
- username:
sa
- password:
sa
The first time you attempt to log in, you will be prompted to change your password.
Configure network
The virtual appliance comes preconfigured to use DHCP. If DHCP is not available, you will need to manually configure an ip address using the command line.
To configure the network the nmtui tool can be used from the command line:
sudo nmtui
Alternatively, a temporary ip address can be configured using the system ip tool:
sudo ip addr add <ip>/32 dev eth0
Replace <ip> with the appropriate ip address and replace eth0 with the correct network interface name.
Cockpit
Once the system has a valid ip address, the system can be further configured using the Ccokpit app on port 9090.
Open the link
https://<ip>:9090in your web browserLogin as the sa user (using the password previously configured for the sa user)
Configure at least the network, hostname, and DNS settings from the Cockpit application.
For more information on the Cockpit App, see Cockpit
Post-import provisioning
The Virtual Appliance is a generalized image. This means that key material, such as SSH keys, and other machine-specific settings are removed before the Virtual Appliance is exported. As a result of this generalization step, a post-import provisioning script should be run after the first login.
After logging in for the first time, the system will display a command-line message indicating that a post-setup playbook needs to be started.
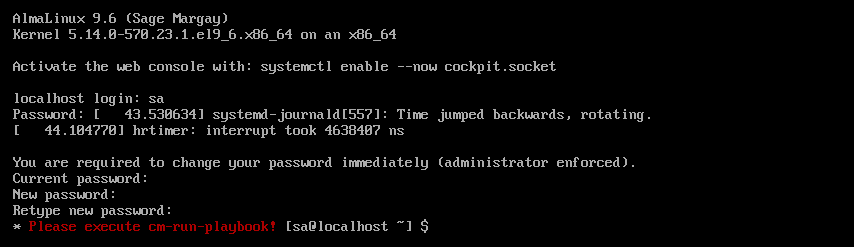
To start the post-setup playbook:
sudo cm-run-playbook
The playbook script may take a few minutes to finish. When finished, the playbook recap should indicate no failures, with
failed displayed as 0.

Tip
The cm-run-playbook command can be executed multiple times. Any configuration that has already been applied
will be skipped and remain unchanged.
Create admin account
To access the UI, an administrator must log in. Since the gateway does not include any pre-configured administrator credentials, you need to create and configure credentials for the initial administrator.
The initial administrator’s credentials can be set using the command-line interface (CLI) tool:
Login as the sa user using the previously selected password
Execute the following CLI commands:
ciphermail-cli auth admin add --name admin --authentication-type username-password
ciphermail-cli auth admin password --name admin --password <password>
ciphermail-cli auth admin roles set --name admin --roles admin
Replace
<password>by a secure password
Login to Admin UI
You can now login to the administrator back-end at: https://<hostname>:8443
Replace <hostname> with the appropriate ip address or hostname.
Use the credentials set in the previous step.
Installing from RPM packages
You can skip this section if you are using our pre-configured system Virtual Appliance.
Note
This paragraph provides guidance on installing the Enterprise edition. To find instructions for installing the Community edition, please visit our Community Gateway Gitlab Page.
The CipherMail Enterprise Gateway has the following requirements:
2 GB memory (≥ 4 GB recommended)
2 vCPU (≥ 4 vCPUs recommended)
≥ 32 GB disk space
A freshly installed Alma Linux 9 system
Internet access
Some of the main tasks the CipherMail Enterprise Gateway installer will perform:
Configure the CipherMail repo
Install required packages
Configure MariaDB database
Configure Postfix
Configure Apache HTTP
Configure the Cockpit app
Set up and configure back-end and front-end applications
Create a back-end user (by default, the Unix user ciphermail-backend)
Create a command line interface (CLI) user (by default, the Unix user sa)
Note
The installer requires tar. Make sure that tar is installed
sudo dnf install tar
Tip
For instructions on installing the Enterprise Gateway on a RHEL 9 system or a system with restricted network access, please reach out to us.
Copy the provided install script to the system
Copy the provided CipherMail license file to the system
Start the installer
sudo ./setup-ciphermail-enterprise-<version>.sh -- --license <license-file>The installer sets up the necessary packages and configures the system using an Ansible playbook. The installation process may take a few minutes. Upon successful installation, the playbook recap should indicate no failures, with
faileddisplayed as0.
Troubleshoot if the playbook encounters an error [click here to open]
If the playbook fails, check the following:
Check if DNS is configured
Check if https://repo.ciphermail.com can be reached
Then try the following:
Re-run the playbook
sudo cm-run-playbookIf that fails again, reboot and run the playbook again
If that fails again, contact support. Provide the following files:
/var/lib/ciphermail/ansible-error
/var/log/ciphermail-ansible.log
Set the password for the sa CLI user
sudo passwd sa
Create admin account
To access the UI, an administrator must log in. Since the gateway does not include any pre-configured administrator credentials, you need to create and configure credentials for the initial administrator.
The initial administrator’s credentials can be set using the command-line interface (CLI) tool:
Login as the sa user using the previously selected password
Execute the following CLI commands:
ciphermail-cli auth admin add --name admin --authentication-type username-password
ciphermail-cli auth admin password --name admin --password <password>
ciphermail-cli auth admin roles set --name admin --roles admin
Replace
<password>by a secure password
Login to Admin UI
You can now login to the administrator back-end at: https://<hostname>:8443
Replace <hostname> with the appropriate ip address or hostname.
Use the credentials set in the previous step.
External Database
Note
This section describes how to configure the enterprise gateway for an external database. If you are using the community edition, please refer to our public GitLab repository located at https://gitlab.com/ciphermail/ciphermail-community-gateway for instructions.
The enterprise edition is installed by default with a local MariaDB database. However, you can configure the gateway to use an external database instead.
MariaDB
On the remote MariaDB server do the following:
Create a database
Create a database user with the following privileges to the CipherMail database:
DELETE, INSERT, SELECT, UPDATE, LOCK TABLES, DROP, CREATE, ALTER, INDEX
Create SQL schema:
/opt/ciphermail/scripts/cm-generate-db-schema.sh \
--output-file <sql-schema-file> \
--database-user <database-user> \
--database-password <database-password> \
--database-connection-url jdbc:mariadb://<database-host>:<database-port>/<database-name> \
--database-driver-class org.mariadb.jdbc.Driver
Import the SQL schema files:
mariadb --host <database-host> --port <database-port> --user <database-user> --password <database-name> < <sql-schema-file>
mariadb --host <database-host> --port <database-port> --user <database-user> --password <database-name> < /opt/ciphermail/ansible/roles/ciphermail-portal-session/files/schema-mysql.sql
Configure gateway to use the external database
Create an ansible override file:
sudo vi /etc/ciphermail/ansible/group_vars/all/database.yml
Paste the following ansible override:
---
ciphermail_database_config__database_type: 'custom'
ciphermail_database_config__connection_url: 'jdbc:mariadb://<database-host>:<database-port>/<database-name>?<database-options>'
ciphermail_database_config__driver_class: 'org.mariadb.jdbc.Driver'
ciphermail_database_config__database_name: '<database-name>'
ciphermail_database_config__database_user: '<database-user>'
ciphermail_database_config__database_password: '<database-password>'
Remove existing cli password and portal back-end password files:
sudo rm /home/sa/.ciphermail-cli
sudo rm /etc/ciphermail/env/portal-backend-password.env
Run the ansible playbook:
sudo cm-run-playbook
PostgreSQL
On the remote PostgreSQL server do the following:
Create a database
Create a database user account that will have ownership of the CipherMail database
Create SQL schema:
/opt/ciphermail/scripts/cm-generate-db-schema.sh \
--output-file <sql-schema-file> \
--database-user <database-user> \
--database-password <database-password> \
--database-connection-url jdbc:postgresql://<database-host>:<database-port>/<database-name> \
--database-driver-class org.postgresql.Driver
Import the SQL schema:
psql -h <database-host> -p <database-port> <database-name> <database-user> < <sql-schema-file>
psql -h <database-host> -p <database-port> <database-name> <database-user> < /opt/ciphermail/ansible/roles/ciphermail-portal-session/files/schema-postgresql.sql
Hint
To install the PostgreSQL client programs, execute the following command:
dnf install postgresql
Configure gateway to use the external database
Create an ansible override file:
sudo vi /etc/ciphermail/ansible/group_vars/all/database.yml
Paste the following ansible override:
---
ciphermail_database_config__database_type: 'custom'
ciphermail_database_config__connection_url: 'jdbc:postgresql://<database-host>:<database-port>/<database-name>?<database-options>'
ciphermail_database_config__driver_class: 'org.postgresql.Driver'
ciphermail_database_config__database_name: '<database-name>'
ciphermail_database_config__database_user: '<database-user>'
ciphermail_database_config__database_password: '<database-password>'
Remove existing cli password and portal back-end password files:
sudo rm /home/sa/.ciphermail-cli
sudo rm /etc/ciphermail/env/portal-backend-password.env
Run the ansible playbook:
sudo cm-run-playbook